Last time I laid out the story behind a screen saver I recently wrote. This time I’ll dive into some of the technical details behind that project.
The project itself is written in C#, using an old Microsoft framework called WinForms. I won’t cover every class in the project since I built upon this project HERE, for the screen saver parts, and the author of that project did a very nice job of detailing how everything works.
Instead, I’ll focus on the screen saver form itself, and the code behind that form. The form is called, appropriately enough, ScreenSaverForm, and the code-behind looks like this:
public partial class ScreenSaverForm : Form
{
class NativeMethods
{
[DllImport("user32.dll")]
public static extern IntPtr SetParent(IntPtr hWndChild, IntPtr hWndNewParent);
[DllImport("user32.dll")]
public static extern int SetWindowLong(
IntPtr hWnd,
int nIndex,
IntPtr dwNewLong
);
[DllImport("user32.dll", SetLastError = true)]
public static extern int GetWindowLong(IntPtr hWnd, int nIndex);
[DllImport("user32.dll")]
public static extern bool GetClientRect(IntPtr hWnd, out Rectangle lpRect);
public const int GWL_STYLE = -16;
public const long WS_CHILD = 0x40000000;
}
private Point mouseLocation;
private bool previewMode = false;
private PrivateFontCollection _fonts;
private readonly List<List<string>> _layers;
private readonly RandomNumberGenerator _random;
protected AppOptions _options;
private Size _lineSize;
private int _lineLength;
private Bitmap? _tempScreenImage;
private Bitmap? _tempLineImage;
private Pen? _tempPen;
private Timer _timer;
public ScreenSaverForm()
{
// Make the form designer happy.
InitializeComponent();
// Set these styles for the form.
SetStyle(ControlStyles.UserPaint, true);
SetStyle(ControlStyles.AllPaintingInWmPaint, true);
SetStyle(ControlStyles.OptimizedDoubleBuffer, true);
// Create the layers collection.
_layers = new List<List<string>>();
// Create a random number generator.
_random = RandomNumberGenerator.Create();
// Create the font collection.
_fonts = new PrivateFontCollection();
// Create default options.
_options = new AppOptions();
// Create a timer.
_timer = new Timer();
_timer.Tick += _timer_Tick;
}
public ScreenSaverForm(
Rectangle bounds
) : this()
{
// Place our window inside the rectangle.
Bounds = bounds;
}
public ScreenSaverForm(
IntPtr PreviewWndHandle
) : this()
{
// Set the preview window as the parent of this window
NativeMethods.SetParent(
Handle,
PreviewWndHandle
);
// Set the child window style.
NativeMethods.SetWindowLong(
Handle,
NativeMethods.GWL_STYLE,
new IntPtr(
NativeMethods.GetWindowLong(Handle, NativeMethods.GWL_STYLE) |
NativeMethods.WS_CHILD
)
);
// Get the parent client's footprint.
NativeMethods.GetClientRect(
PreviewWndHandle,
out var ParentRect
);
// Place our window inside the parent
Size = ParentRect.Size;
Location = new Point(0, 0);
// We are in preview mode.
previewMode = true;
}
protected override void OnLoad(
EventArgs e
)
{
// In this method we're initializing the form.
try
{
// Read the options.
_options = AppOptions.ReadFromRegistry();
// Load the embedded font(s).
_fonts.LoadFromResources(
"MarsVoyager Travelers"
);
// Hide the cursor.
Cursor.Hide();
// Bring the form to the top of the z-order.
TopMost = true;
// Calculate the metrics for the lines.
CalculateLineMetrics();
// Create the layers.
CreateLayers();
// Start the timer.
_timer.Interval = _options.Speed;
_timer.Enabled = true;
// Give the base class a chance.
base.OnLoad(e);
}
catch (Exception ex)
{
// Tell the world what happened!
MessageBox.Show(
this,
$"Failed to show the screen saver form! {Environment.NewLine}" +
$"Error: '{ex.Message}'",
$"{Application.ProductName} {Application.ProductVersion}",
MessageBoxButtons.OK,
MessageBoxIcon.Error
);
// Close the application.
Application.Exit();
}
}
protected override void OnClosed(
EventArgs e
)
{
// In this method we're closing the form.
// Show the cursor.
Cursor.Show();
// Cleanup resources.
_timer.Enabled = false;
_timer.Dispose();
_tempScreenImage?.Dispose();
_tempLineImage?.Dispose();
_random?.Dispose();
_fonts?.Dispose();
_tempPen?.Dispose();
// Give the base class a chance.
base.OnClosed(e);
}
protected override void OnMouseMove(
MouseEventArgs e
)
{
// In this method we're responding to a mouse move.
// We are NOT in preview mode?
if (!previewMode)
{
// Has the mouse NOT yet moved before?
if (!mouseLocation.IsEmpty)
{
// Did the mouse move enough to be on purpose?
if (Math.Abs(mouseLocation.X - e.X) > 5 ||
Math.Abs(mouseLocation.Y - e.Y) > 5)
{
// Stop the application.
Application.Exit();
}
}
// Update current mouse location
mouseLocation = e.Location;
}
// Give the base class a chance.
base.OnMouseMove(e);
}
protected override void OnMouseClick(
MouseEventArgs e
)
{
// In this method we're responding to a mouse click.
// We are NOT in preview mode?
if (!previewMode)
{
// Stop the application.
Application.Exit();
}
// Give the base class a chance.
base.OnMouseClick(e);
}
protected override void OnKeyPress(
KeyPressEventArgs e
)
{
// In this method we're responding to a key click.
// We are NOT in preview mode?
if (!previewMode)
{
// Stop the application.
Application.Exit();
}
// Give the base class a chance.
base.OnKeyPress(e);
}
protected override void OnPaint(
PaintEventArgs e
)
{
// In this method we're painting the screen saver,
// Get the font family.
var fontFamily = _fonts.Families.FirstOrDefault(
x => x.Name == _options.FontFamily
) ?? FontFamily.GenericSerif;
// Get the font size.
var fontSize = _options.FontSize;
// Get the glow color.
var glowColor = Color.FromName(
_options.GlowColor
);
// Should we create the pen?
if (null == _tempPen)
{
// Create the custom glow pen.
_tempPen = new Pen(
glowColor,
3
);
}
// Paint layer 0.
PaintLayer(
e.Graphics,
fontFamily,
FontStyle.Italic,
fontSize,
Pens.White,
0.2f,
_layers[0]
);
// Paint layer 1.
PaintLayer(
e.Graphics,
fontFamily,
FontStyle.Regular,
fontSize,
_tempPen,
0.6f,
_layers[1]
);
}
private void CalculateLineMetrics()
{
// In this method we're calculating basic numbers that we'll need,
// later, to fill the display with random text.
// Get the font family.
var fontFamily = _fonts.Families.FirstOrDefault(
x => x.Name == _options.FontFamily
) ?? FontFamily.GenericSerif;
// Get the font size.
var fontSize = _options.FontSize;
_lineSize = new Size();
_lineLength = 0;
// Create the font.
using (var font = new Font(
fontFamily,
(float)fontSize,
FontStyle.Regular
))
{
// Get the device context.
using (var gdi = Graphics.FromHwnd(Handle))
{
// Loop until we've filled the client width.
while (_lineSize.Width < ClientRectangle.Width)
{
// Get a line of Z's (Z to guestimate the average
// width of a character, in this font).
var line = new string(
'Z',
_lineLength += 10
);
// Measure the line.
_lineSize = gdi.MeasureString(
line,
font
).ToSize();
}
}
}
// The "MarsVoyager Travelers" font has an odd symbol that
// I haven't yet been able to map to a specific character,
// but, it seems to love hanging out at the end of the lines,
// so, we'll expand the line size, a bit, to shove any unwanted
// symbols out of sight.
_lineLength += (int)(_lineLength * 1.6f);
// My calculation seems to want the font to be higher than it
// really is, resulting in too much space between lines. I
// don't know if that's something odd with the font, or,
// something odd with my math. In either case, this line
// of code is scaling the height down a bit, to compensate.
_lineSize.Height -= (int)fontSize / 3;
}
private void CreateLayers()
{
// In this method we're creating the layers for the screen saver.
// Clear any old layers.
_layers.Clear();
// Loop and create the layers.
for (var x = 0; x < 2; x++)
{
// Create the new layer.
_layers.Add(new List<string>());
// Loop and create lines for the layer.
for (var y = 0; y < Height; y += (int)_lineSize.Height)
{
// We'll fill the layer with actual text later. For now,
// the spaces are fine.
// Add a string of spaces.
_layers[x].Add(
new string(' ', _lineLength)
);
}
}
}
private void _timer_Tick(object? sender, EventArgs e)
{
// In this method we're moving text around, replacing symbols, etc,
// trying to make our text display more interesting to watch.
// Loop through the layers.
for (var x = 0; x < _layers.Count; x++)
{
// Loop through the lines.
for (var y = 0; y < _layers[x].Count; y++)
{
// Get some replacement characters.
var replacementText = _random.NextString(
_lineLength
);
// Copy the line.
var sb = new StringBuilder(_layers[x][y]);
// Loop and replace a random number of characters.
for (var z = 0; z < _random.Next(0, _lineLength); z++)
{
// Get a random character location.
var index = _random.Next(0, _lineLength);
// Should we set the character to a space?
if (_random.Next(1, 100) is >= 0 and <= 50)
{
// Set the character to a space.
sb[index] = ' ';
}
else
{
// Overwrite the specified character.
sb[index] = replacementText[index];
}
}
// Should we scroll this line?
if (_random.Next(1, 100) is >= 10 and <= 20)
{
// Scroll the line by one character.
sb = new StringBuilder(
sb[_lineLength - 1] + sb.ToString(0, _lineLength - 1)
);
}
// Copy the changes back to the line.
_layers[x][y] = sb.ToString();
}
}
// Force a repaint.
Invalidate();
}
private void PaintLayer(
Graphics graphics,
FontFamily fontFamily,
FontStyle fontStyle,
decimal fontSize,
Pen glowPen,
float opacity,
List<string> lines
)
{
// In this method we're painting all the lines for a layer
// on the screen.
// Should we create the image?
if (null == _tempScreenImage)
{
// Create a scratch image to draw on.
_tempScreenImage = new Bitmap(
ClientRectangle.Width,
ClientRectangle.Height,
PixelFormat.Format32bppArgb
);
}
// Create a device context from the image.
using (var tempGraphics = Graphics.FromImage(_tempScreenImage))
{
// Clear the image.
tempGraphics.Clear(
Color.Transparent
);
// Loop through all the lines.
for (var x = 0; x < lines.Count; x++)
{
// Calculate a footprint for the line of text.
var rect = new Rectangle(
0,
x * _lineSize.Height,
_lineSize.Width,
_lineSize.Height
);
// Draw the text with a glow effect.
DrawStringWithGlow(
tempGraphics,
rect,
fontFamily,
FontStyle.Regular,
(int)fontSize,
glowPen,
lines[x]
);
}
}
// Draw the image to the screen.
DrawImageWithOpacity(
graphics,
_tempScreenImage,
ClientRectangle,
0,
0,
_tempScreenImage.Width,
_tempScreenImage.Height,
GraphicsUnit.Pixel,
opacity
);
}
private void DrawImageWithOpacity(
Graphics graphics,
Image image,
Rectangle destRect,
float srcX,
float srcY,
float srcWidth,
float srcHeight,
GraphicsUnit srcUnit,
float opacity
)
{
// In this method we're drawing an image with opacity.
// Setup a matrix for the changing the alpha channel.
float[][] matrixItems =
{
new float[]{1, 0, 0, 0, 0},
new float[]{0, 1, 0, 0, 0},
new float[]{0, 0, 1, 0, 0},
new float[]{0, 0, 0, opacity, 0},
new float[]{0, 0, 0, 0, 1}
};
var colorMatrix = new ColorMatrix(matrixItems);
// Create image attributes to control the drawing.
using (var imageAtt = new ImageAttributes())
{
// Apply the matrix.
imageAtt.SetColorMatrix(
colorMatrix,
ColorMatrixFlag.Default,
ColorAdjustType.Bitmap
);
// Draw the image.
graphics.DrawImage(
image,
destRect,
srcX,
srcY,
srcWidth,
srcHeight,
srcUnit,
imageAtt
);
}
}
private void DrawStringWithGlow(
Graphics graphics,
Rectangle destRect,
FontFamily fontFamily,
FontStyle fontStyle,
int fontSize,
Pen glowPen,
string text
)
{
// In this method we're drawing text with a glow effect.
// The size of our glow effect.
var glowSize = 6;
// Make it look all purdy.
graphics.SmoothingMode = SmoothingMode.AntiAlias;
graphics.InterpolationMode = InterpolationMode.HighQualityBicubic;
// Should we create the image?
if (null == _tempLineImage)
{
// Create a scratchpad image to work with.
_tempLineImage = new Bitmap(
destRect.Width / glowSize,
destRect.Height / glowSize,
PixelFormat.Format32bppArgb
);
}
// Create a graphics path.
using (var tempPath = new GraphicsPath())
{
// Add the string to the path.
tempPath.AddString(
text,
fontFamily,
(int)fontStyle,
graphics.DpiY * fontSize / 72,
new Point(0, 0),
StringFormat.GenericTypographic
);
// Create a device context to draw with.
using (var tempGraphics = Graphics.FromImage(_tempLineImage))
{
// Clear the image's background.
tempGraphics.Clear(
Color.Transparent
);
// Make it look all purdy.
tempGraphics.SmoothingMode = SmoothingMode.AntiAlias;
// Create a matrix to control the glow effect.
using (var tempMatrix = new Matrix(
1.0f / glowSize,
0,
0,
1.0f / glowSize,
-(1.0f / glowSize),
-(1.0f / glowSize)
))
{
// Set the matrix in the device context.
tempGraphics.Transform = tempMatrix;
// Draw the path, which is really our text.
tempGraphics.DrawPath(
glowPen,
tempPath
);
}
// Now draw the image resized up to the original footprint,
// thereby creating the glow effect we're after.
graphics.DrawImage(
_tempLineImage,
destRect,
0,
0,
_tempLineImage.Width,
_tempLineImage.Height,
GraphicsUnit.Pixel
);
// Create another temporary matrix.
using (var tempMatrix2 = new Matrix())
{
// We need to create a translation to account for
// any offset in the client rectangle.
tempMatrix2.Translate(
destRect.X,
destRect.Y
);
// Move the path.
tempPath.Transform(
tempMatrix2
);
}
// Refill the repositioned path so the characters stand
// out against our nicely glowy backdrop.
graphics.FillPath(
Brushes.Black,
tempPath
);
}
}
}
}
Obviously, there’s a bit going on here. Don’t worry though, we’ll break it down so it all (hopefully) makes sense.
The top of the form has an embedded class named NativeMethods. That class holds all our PInvoke declarations. The class itself isn’t very important, it was just a “best practice”, from long ago, for housing PInvoke stuff.
The form has a variety of fields that are all used to draw the screen saver. I won’t go into each field individually. Just know that if I reference a field, later, it’s going to live up here, with all the other fields.
The form has three constructors. The first one is the default constructor used by the WinForms form designer. Although I didn’t use the WinForms designer in this project, WinForms still wants each form to have a default constructor. We won’t fight that. Looking at the source, we see that the constructor calls InitializeComponent, which is the method that the WinForms form generator creates. After that, we call SetStyle several times to: (A) turn on double buffering, which makes the painting smoother, (B) direct all painting to the OnPaint method, which gives us fewer methods to deal with, and (C) to tell WinForms that we want to paint this form ourselves. After that I initialize a few of the fields to prevent the new C# compiler from harassing me about possible null references at every turn.
The second constructor accepts a Rectangle parameter. That rectangle represents the bounding area for whatever screen this form lives on. This is the constructor that gets called when Windows calls our screen saver. We use that rectangle to set our Bounds property, which, in turn, determines the runtime dimensions of our form.
The third constructor accepts a handle to a preview window. This is the constructor that is called whenever someone previews our screen saver, in the Windows “Screen Saver” dialog. That looks like this:
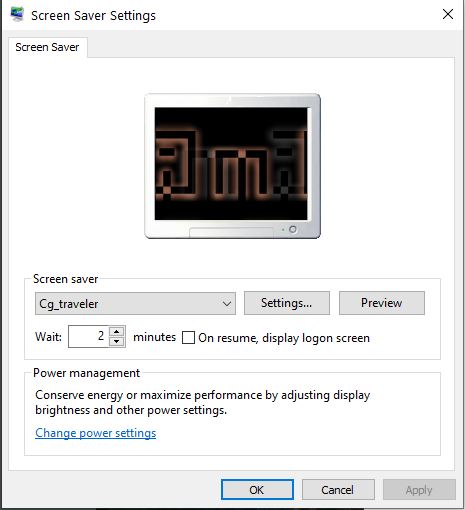
In order for our screen saver to appear inside the little computer monitor, on that dialog, we have to jump through a few hoops. First, we have to call SetParent, to make our ScreenSaverForm a child of that little computer monitor. Next, we call SetWindowLong to set the WS_CHILD window style, for our form, which allows Windows to ensure that our form tracks any movement, should the user move the dialog around on the screen. Next we call GetClientRect to get the dimensions we’ll need to fill that little computer monitor. Finally, we set our dimension to that rectangle, and then we set the preview flag. We’ll use the preview flag, later, so remember that part.
Once our form is created, regardless of which constructor was used, the next thing that gets called is the OnLoad method. The first thing we do here is call AppOptions.FromRegistry, to read our screen saver’s options from the registry. I’ll cover that code towards the end of this article. For now, just know that we’re reading options from the registry with that call. The next thing we do is call the LoadFromResources extension method, on the PrivateFontCollection type. I’ll cover that code shortly. For now, just know that we’re reading an embedded font and loading it into the font collection there. We then hide the mouse cursor, since it would just be in the way while the screen saver is running. We then fix the Z-order of our window, to ensure we cover any other windows. We then call CalculateLineMetrics, to determine how long a string must be, to fill the display. Next we call CreateLayers to create the collection of strings we’ll need to display our “traveler” text. Finally, we set the speed for our timer, from the options, then enable it, to start drawing our screen saver. That time is what drives the updates for the screen saver.
Once our screen saver has been running, and it comes time to close everything up, the framework calls our OnClosed method. Here we show the mouse cursor again, since we’ll need our mouse to operate Windows. Next, we cleanup all the fields we saw earlier. Most of those fields contain GDI resources, and so, should be managed carefully to prevent memory leaks.
Once the screen saver is running, there are typically three things what will stop it: (A) moving the mouse, (B) pressing a mouse button, and (C) pressing any key on the keyboard. Let’s go look at the OnMouseMove method next, which is what gets called whenever we move the mouse. The first thing we do is check the previewMode field. That field was set inside the constructor that accepts the preview window handle, remember? When previewMode is true, we don’t want to respond to mouse movement, since we would break the preview dialog by doing so. So, if we’re running in the preview dialog, we ignore the mouse movement. If not, we do a little bit of math to determine whether or not the mouse moved more than 5 pixels. If so, we close the application – which stops the screen saver. The 5 pixels is arbitrary, really. The point is, to ignore tiny shakes of the mouse, but still respond to an actual move of the mouse, by the user.
Clicking a mouse button causes the OnMouseClick method to be called. Here we check that previewMode field again. Remember previewMode? if previewMode is true we ignore the mouse button click. If not, we stop the screen saver.
Pressing a key causes the OnKeyPress method to be called. Here we check the previewMode field, so that we don’t exit the screen saver if we’re showing the preview dialog. If previewMode is false, that means the screen saver is running, so, we close it.
The only other form method we need to cover is OnPaint, which is responsible for painting the graphics for our screen saver. The first thing we do, in OnPaint, is get the appropriate FontFamily from our private font collection. The we go on to get the font size and glow color from the options. Next, we use the glow color to create a pen, for drawing that glow on the top layer (the bottom layer is always drawn with a white glow). Finally, we call the PaintLayer method, twice, to paint each of the two layers in this screen saver.
And that’s it! … Nah, just kidding. But, we’ve only got a handful of methods left to cover. Before I continue on to that part, let’s stop and quickly discuss how the screen saver is logically structured, and why.
Right now, the screen saver is pretty simple. It covers the screen in random text and moves the characters around in interesting ways. That’s fine, for right now. But, eventually, I’d like to do more. I’m not sure, yet, what more means, but I know that this code needs to be flexible. With all that in mind, I decided to paint individual layers so that I could, add things, or animate things, or whatever it is that I eventually decide to do. If I had painted everything as a single data structure it would have been easier to code, but, it also would have made everything harder to change, down the road.
As I write this, each layer of this screen saver consists of a list of strings, where each string represents a single line of text. Each layer has enough strings to cover the screen with text, which is the point of the screen saver.
Let’s start by looking at the logic that decides how many characters to draw across the screen. That’s done with the CalculateLineMetrics method. CaclulateLineMetrics starts by getting the FontFamily and font size for the layer. Next we create a temporary instance of the font. Finally, we get an instance of a Graphics object, using the window handle for our form. Once we have all those things, we loop and start building a string of ‘Z’ characters. Why ‘Z’ characters? Well, the Z character has an above average width, so, a string of Z’s will also have an above average width. Once we have enough Z’s to cover the screen then we’ve probably got enough characters to ensure that we don’t leave any bare spots in our screen saver. The only thing left to do is measure the width of the string, using the GDI objects we created earlier. We do that with the call to MeasureString. Once we know that the string is long enough to cover the span the display, we can stop adding ‘Z’ characters. Now, this algorithm isn’t going to win me any awards, but it does give me a ballpark number of characters, which is what I need it to do. Luckily, the method is only called once, at the start of the screen saver.
Once we know how long the layer strings need to be, we can then use that number to create the layers themselves. We do that in the CreateLayers method. We start by looping through the two layers, creating a list of spaces for each line, until we have enough lines to fill the screen. For now, I’ve hard coded the number of layers at two. In the future, that number might be more dynamic.
Once we have the layers, with the list of strings, the next thing we need to do is fill those strings with random characters. But, we also need to change those characters in interesting ways, throughout the life of the screen saver. We use a timer for that purpose. That timer calls the _timer_Tick method, which is where we manipulate the contents of our layers.
_timer_Tick starts by looping through all the layers. For each layer it then loops through all the lines for that layer. For each line, It generates a string of random characters, using the NextString method, on the RandomNumberGenerator object we created when we created the form. Once we have the random string, we then loop through and make a random number of replacements in the layer’s line. We might also randomly scroll the line. The end result is just enough change to “save” our screen, and keep our eyes interested, even if only for a little while. The last thing we do, in this method, is call Invalidate, which tells Windows that we need to be repainted.
At this point we’ve created layers of text that are each having random replacements made to them, through a timer callback. Each time that timer fires, we also tell Windows we need to be repainted, which calls our OnPaint method. We’ve looked at the OnPaint method already, so now let’s look at the code that actually paints our layers. That is done with the PaintLayer method.
PaintLayer creates a scratch image that we then cache in the _tempScreenImage field. Next we create a Graphics object from that image, so we can draw on it. Next we clear the bits to the transparent color, so the background of our screen saver will show through. Next we loop through all the line in the layer. For each line we calculate a bounding rectangle, which will only cover the space needed to paint that line. Next we call DrawStringWithGlow, to draw the actual text with a nice glow effect. After all the lines are drawn this way, the entire image is then drawn to the screen using the DrawImageWithOpacity method.
That now leaves us with two methods to cover: DrawStringWithGlow, and DrawImageWithOpacity. I’ll start with DrawStringWithGlow first:
The first thing we do, in DrawStringWithGlow, is setup the smoothing mode and interpolation mode for the Graphics object. That just ensures we don’t end up with jagged text on the screen. Next, we create another temporary image, this time the size of a single line of text. We’ll be drawing on that image in this method. Next we create a GraphicsPath object, which will hold the path for the text we’re drawing. Next we add our text to our drawing path. Next we create a Graphics object form our line image, so we can start drawing. We clear the image to the transparent color, so the background will show through. Next we set the smoothing mode for our temporary Graphics object, so our path won’t have jagged edges when we draw it. Next we setup a Matrix object, for manipulating the glow effect. We set that transform on our temporary Graphics object, so it will get used for the upcoming GDI operations, then we draw the path, which is really our string of text.
At this point our temporary image has what will become the glow for our text painted on it. Now we have to paint that image to the screen, which we do with the next DrawImage method call. But, in order to make the glow happen, we increase the size of the rectangle, slightly, which stretches the image out, and is really what makes the glow happen. If we stopped now, we’d have a sort of glowing text thing going on, but it wouldn’t look very good. The reason is, by stretching the text out, it sort of becomes a soft, nebulous mass of color. What we need, to make the text stand out against our glow, is to draw the text again, but with a different color. But, in order to do that, we now have to adjust the path to account for the offset in our line (recall that we’re calling this method once for each line, in order to fill the screen with lines of text). So, we make that adjustment by translating our matrix so that it lines up with where we drew the text, then we transform the path, which is the thing that actually moves everything around. After all that, we can simply fill the back with a color the have nice, clear, sharp text, against our glowing backdrop.
Once we’ve called DrawStringWithGlow, for each line of text, and painted the results to our in-memory screen image, we then have to decide how bright we want that image to be, on the actual screen. Recall that we have multiple layers going on. The background layer isn’t as bright as the foreground layer. The way we do that is by calling the DrawImageWithOpacity method. Let’s go look at that now:
The first thing we do, in DrawImageWithOpacity, is setup another kind of matrix, this time one for manipulating the individual color channels of an image. In our case, we’re specifically interested in the alpha channel, since that’ how we’ll efficiently adjust the overall opacity of the entire image. Once we have the numbers setup for our color matrix, we use that to create a ColorMatrix object. Next, we create an ImageAttributes object, which is an object that is used to manipulate images with. Next we set the color matrix on our image attributes. Finally we call an overload of the DrawImage method that accepts our ImageAttributes object. The result is that we have drawn our in-memory image to the screen, with a specific opacity. This is what allows us to control the overall brightness of the screen saver. It’s also how we make the background image less noticeable, at runtime.
That really about it, for the screen saver form. The only other methods I’ll cover, because I promised I would, earlier, are the LoadFromResources method, which pulls our embedded font out of resources and makes it available for GDI operations, and, the NextString method, which is what we’re using to generate our random strings with. Let’s start by looking at the LoadFromResources method:
private static readonly char[] _chars =          "abcdefghijklmnopqrstuvwxyzABCDEFGHIJKLMNOPQRSTUVWXYZ1234567890".ToCharArray();

public static PrivateFontCollection LoadFromResources(
    this PrivateFontCollection fonts,
    string resourceName
    )
{
    // In this method we're writing an embedded font to disk so we
    //   can load it into the font collection.

    // Make a path for the font.
    var path = Path.Combine(
        Path.GetTempPath(),
        $"{Path.GetFileNameWithoutExtension(resourceName)}.ttf"
        );

    // Don't overwrite the file if it's already there.
    if (false == File.Exists(path))
    {
        // Get the resource as bytes.
        var bytes = Properties.Resources.ResourceManager.GetObject(
                resourceName,
                CultureInfo.CurrentCulture
                ) as byte[];

        // Did we fail?
        if (null == bytes)
        {
            // Panic!!
            throw new ArgumentException(
                message: $"Unable to load the resource: '{resourceName}'"
                );
        }

        // Write the bytes to disk.
        File.WriteAllBytes(
            path,
            bytes
            );
    }

    // Add the font to the collection.
    fonts.AddFontFile(path);

    // Return the font collection.
    return fonts;
}
LoadFromResources starts by building a path to where we’ll be writing our font file out. We then check to see if that file already exists. That’s because, if we already have the file on disk, then we really don’t need to overwrite it. Assuming the file isn’t there, we then get the bytes for our font file from the resources. If that load operation fails, we throw an exception. The only time I’ve ever seen that fail though, is when I fat finger the resource name and it simply can’t find the resource. Otherwise, it’s a pretty reliable operation. Once we have the bytes for the font, we write it to disk with a call to WriteAllBytes, using the path we created earlier. Once we have a font file on disk, we can then load it into our private font collection using the AddFontFile method. This allows us to use a font without forcing the computer owner to install it, with Windows, first.
The last method I’ll cover is called NextString. This is how we create the random strings that get displayed on the screen saver. The first thing we do is allocate a buffer big enough for all the random characters we’ll need in our string. Next, we call GetBytes, on the RandomNumberGenerator, to give us the random data we need. Next we loop through that array of random data and convert each value to an index. Once we have that index, we use it to lookup a replacement character, which we then poke into the proper place in the string builder. Once we have all the replacements done, we return the string value of the string builder, which is our string of random characters.
I won’t pretend that I wrote all the code for this screen saver myself. Some of it I’ve borrowed from other online sources (with attributes where I could find them). Some of it I borrowed, years ago, from the developers that I learned from, back before the interwebz became an actual thing.
The random string idea I first saw HERE, I simply adapted it for my own needs.
The glow text effect I got form somewhere online. I’m sorry but, as I write this, I don’t remember where I got it from. It’s awesome code though and I thank the original author for sharing it.
The .NET screen saver project I got from HERE.
The Traveler font I got from HERE.
Thanks to everyone who helped me put this little project together.
I think of this screen saver as a minimally viable product, in that I have ideas for improving it, down the road. For instance, I think it would be fun to add a third layer and have it display random messages and alerts from the “Director” (you have to have seen the TV show).
I also thought it might be fun to offer several alternative renderings. For instance, the glow text looks cool, but, the original TV show prop screen doesn’t use it.
Then there are the easier additions – things like offering more font’s, or colors, or things like that.
For now though, it’s a fun little project that took me a couple of afternoons on a weekend to finish. I hope everyone enjoys it.
Thanks for reading!
Photo by Diego González on Unsplash