
I thought today I would write about a new .NET MAUI project I wrote. The project source code can be found HERE. The project is a reimagining of my old CG.Tools.QuickCrypto application, except that, this time, I rewrote everything with .NET MAUI and .NET 6.x.
A quick disclaimer: As I write this, .NET MAUI is in preview 14 and will hopefully be released soon. Because of that, some things might change on my project. Just be aware of that. It’s the price we all pay for dancing on the cutting edge of technology, right?
I’ll use this article to go over the application itself, it’s UI, and how to use it. I’ll write about the internals in the next article.
The application itself looks like this:
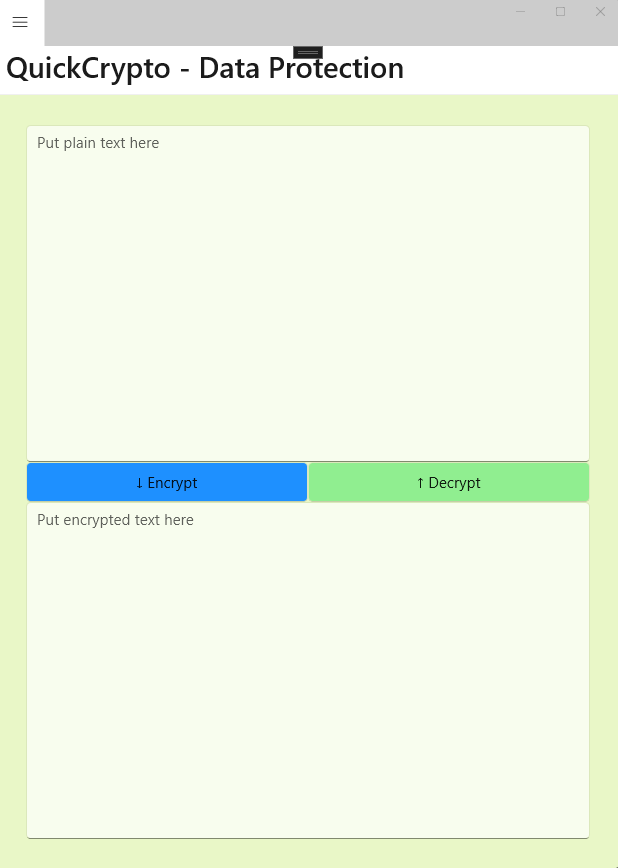
Well, it looks like this when running on Windows, anyway. Since it’s a .NET MAUI application, that means it also (theoretically) runs on iOS, Android, and Mac Catalyst. I admit though, I haven’t tried any of those possibilities – yet. For me, since I’m mostly a Windows guy, this is mostly a Windows tool.
So, to use the app, simply type some text in the top control, press the ‘encrypt’ button, and get the encrypted equivalent below, in the bottom control.
Behind the scenes, the Data Protection page uses the ASP.NET IDataProtector object to protect or unprotect data, without the need for a password. Since we don’t need an explicit password, we also don’t have the problem of how to protect that password from prying eyes. That’s what makes the IDataProtector approach so nice to use. Now, I’d be the first to say, IDataProtector isn’t appropriate for all cryptographic needs. But, it’s a decent general purpose tool, and it’s used heavily in ASP.NET and Blazor, and that’s why I wrapped it here … In my overly colorful, yet oddly functional, MAUI based UI.
Here’s another page, this one entitled AES. If you need a more industry standard crypto algorithm than the ASP.NET Data Protector, then this one is for you:
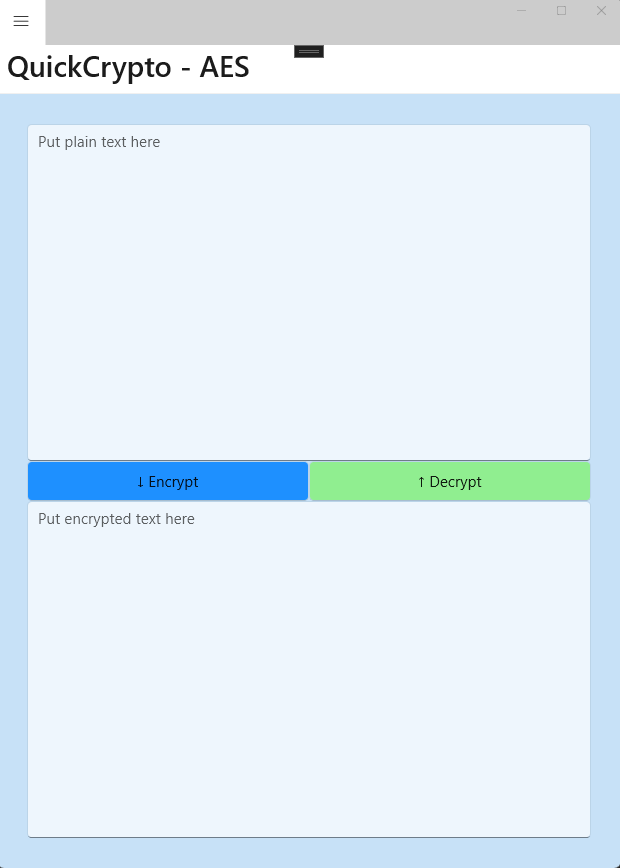
This page works functionally the same as the previous one: Put some clear text in the top edit control, press the encrypt button, and the resulting encrypted text shows up at the bottom of the page. Or, if you need to go the other way, put encrypted text in the bottom edit control, press the decrypt button, and the decrypted text shows up at the top.
Of course, there is also the need for a settings page. That page looks like this:
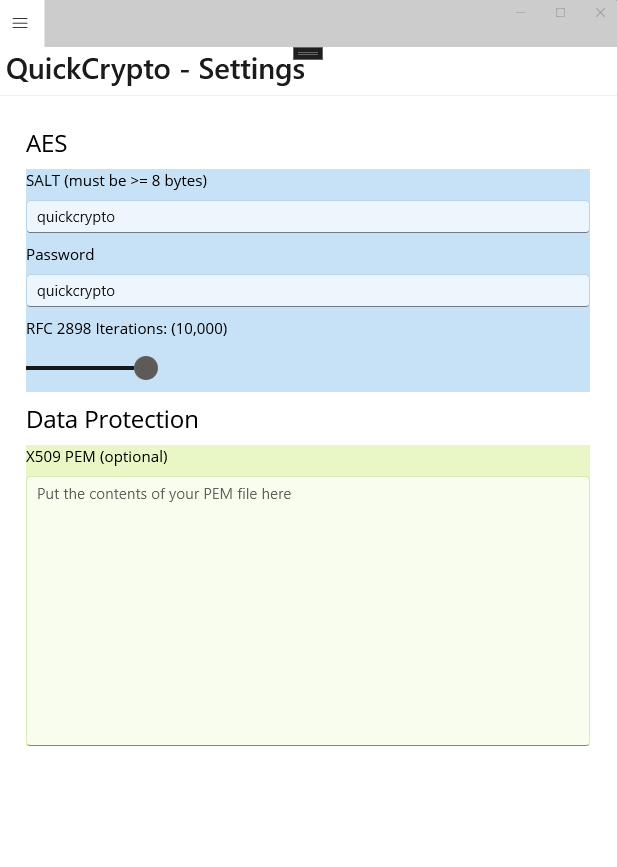
The two sections are color coded the same as their respective pages. So, blue for the Data Protection settings, and green for the AES settings.
The Data Protection library is, frankly, ridiculously configurable. I narrowed down the possibilities and chose to simply protect the keys, at rest, using an X509 certificate. That certificate can be anything you need it to be. For instance, I have a self-signed dev cert that works just fine for my local needs. In production, you would want to purchase a cert from a vendor. In any case, for development, just use OpenSSL, or whatever tool you’re comfortable with, create a cert, then save it as a .PEM file. Once you’ve done that, then open that file, grab the text (including the BEGIN CERTIFICATE and END CERTIFICATE parts), and paste it here. Once that’s done, CG.Tools.QuickCrypto uses that certificate to encrypt the underlying keys for the ASP.NET Data Protector. That (hopefully) prevents bad actors from prying into your secrets.
To be sure, the Data Protector works just fine without a certificate. Adding one simply makes everything a little more secure. It’s really up to you, and your specific needs.
The settings for the AES page include three fields: a SALT, a password, and something called iterations. Let’s talk about those now.
According to WIKI, a SALT value is “random data that is used as an additional input to a one-way function that hashes data, a password or passphrase.” Confused yet? I am! Alright, I’m no mathematician, or cryptography expert, but Ill try to explain. I think that without a SALT, the output of the hash function produces nicely consistent and reproduceable values. That’s not as good as it sounds though, since it makes it easier for a hacker to figure out your hash values and steal your protected data. So, a SALT value (which is really just a bit of randomness), makes those hash value(s) a little harder to reproduce. Apologies if I completely killed that explanation. I tried. The only thing to keep in mind is, with AES, the SALT needs to be at least 8 bytes long, so use a SALT value that’s long enough here.
Password is self explanatory. I hope it is, anyway.
Now let’s talk about that weird “iterations” slider! What’s up with that?? So, again, I’m no crypto expert, but, I’ll try to explain why I added this to the settings. In .NET, all strings are 32 bits. That’s because .NET supports a wide variety of languages, including those that require extra information to make a character – such as Chinese. However, English is not one of those languages. In fact, English only needs 8 bits for the characters you’re reading right now. As a result, if I use a password with English characters, in a .NET string, most of the bits in that string are actually zero. Why is this significant? Because it means anyone trying to guess our password can immediately throw out most of the higher bits, because they’ll know they aren’t used. That means our password(s) are significantly more hackable than they should be.
Luckily, someone smarter than I am figured out a solution to this little problem. In fact, they codified it into a standard called RFC2898. Now, I’ll be candid. My eyes glazed over while trying to read the official RFC2898 document, so, I won’t go there. Instead, I’ll wing things a bit and come up with my own, simpler, explanation. Apologies, in advance, for stepping on any theory, science, or whatever in the process.
Personally, I imagine what RFC2898 does is, it takes the SALT value we supplied earlier (remember the SALT value?), and our password, and it iterates over those values some number of times, calculating like crazy, until it comes up with a cryptographically secure key value – one that uses all the available bytes in a .NET string, along with the randomness of our SALT.
When we take that generated key value and use it in place of our password, the results are far more secure than they would have been otherwise. After all, for the most part, hackers don’t need to attack the cryptographic algorithms themselves. They only have to attack the keys we use – the password and SALT values themselves. Cracking an algorithm is hard. Cracking the average person’s password isn’t.
So, yeah that’s all fine and good, but, what’s with the iterations?? Well, the RFC2898 algorithm is intended to be applied some number of times to the SALT and password. I think the suggested value is at least 10,000 times. Yup, 10,000 times. Why 10,000 times? Well, anyone trying to hack our password would have to go through those same 10,000 iterations, each time they tried to guess our password. RFC2898 is pretty fast, but, having to do that for each guess makes the prospect of launching a dictionary attack against our password just that much harder, and slower. Not impossible, but more difficult. To me, that’s good enough. So, my long winded answer, for why I added “iterations” to the settings, is that I did it so you can pick your own value, and in doing so, force any sneaky hackers to guess what that value is, each time they try to hack your password. You can leave it at 10,000. That number is fine. But, you have the option to change it.
So that’s pretty much it, for CG.Tools.QuickCrypto. A handy little tool to have whenever you need to quickly encrypt / decrypt something and you don’t want to stop and write the code to perform those steps yourself.
I typically use this tool to edit protected fields in my appSettings.json files. In fact, the crypto code in this tool is exactly the same as the code in my CG.DataProtection NUGET package. That means the two can be paired together for even more convenience.
Next time I’ll get into how I created the app, using the latest .NET MAUI framework.
Thanks for reading, I hope you enjoyed the article. I hope you enjoy the tool.
Photo by Shubham Dhage on Unsplash